Category: General

  • Review: Adafruit ARDX Experimentation Kit for Arduino

    Review: Adafruit ARDX Experimentation Kit for Arduino

    My dad got me an ARDX Experimentation Kit for Arduino for my birthday. I just finished all the 13 experiments and I have to say it is a pretty awesome kit and a good introduction to the Arduino. The kit comes with a variety of input and output components/devices including:

    • 10x Red and 10x Green LEDs
    • 10mm Blue LED
    • 5mm RGB LED
    • Force Sensor
    • DC Motor
    • Hobby Servo
    • Shift Register
    • Piezo Element
    • Pushbuttons
    • Variable Resister/Potentiometer
    • Photo Resister
    • Temp Sensor
    • Relay

    Also included are some transistors, resistors, diodes, etc. After you finish going through the experiments this gives you a good head start once you decide to build your own project.

    Another bonus to the kit is that is comes with a custom cut piece of clear acrylic to mount the included Arduino and a bread board. There are wiring sheets you can cut out and overlay on the bread board but I didn’t find these necessary.

    Code for most of the projects can be found online at the URLs mentioned in the instructions with the exception of the last two experiments. For the RGB LED experiment I could not find the code online and I had trouble with the code printed in the manual. I had to make the color arrays regular variables instead of constants to get the code to work for me. I could not find the force sensor code online either but the code printed in the manual worked and was pretty trivial to enter.

    Overall I have to say this is a great kit for someone that would like to learn how to use Arduino to interface with real world devices.

  • TreeBot

    TreeBot

    For Christmas 2011 Pictometry had a holiday “Throwdown” challenge. Each department was given box of miscellaneous items that had to be incorporated into some sort of creation. The box was handed off from one engineer to the next. Everyone was too busy. Finally, with two days left before the judging, it was time to take action. With much help from my fellow engineers I built TreeBot, a remote control Christmas Tree with all the trimmings and wireless video for remote operation.

    It consists of my old Duratrax Evader RC car with a Christmas Tree mounted to it, Christmas lights on a power inverter, an iPod Shuffle playing Christmas tunes on an amplified speaker and a 2.4 Ghz video transmitter for remote operation. It is decorated with various items we had to use in our creation. We came in second place behind Finance who did a Christmas Carol play using the items as props but I feel it was a good entry representative of engineering given the time constraints.

    I took some pictures of TreeBot as I took it apart in case we decide to build something similar next year:

  • Funbat Scratch Build

    Funbat Scratch Build

    I just finished a scratch build of the Funbat, an RC plane design that uses Dollar Tree foam board designed by Bloody Micks. I posted build pictures here on RCGroups.com. Now I just need a nice calm day.

  • PHP/Apache running on Linux won’t connect to a PostgreSQL server

    PHP/Apache running on Linux won’t connect to a PostgreSQL server

    SELinux will block PHP/Apache from connecting to PostgreSQL (and probably any other DB) by default on some Linux distributions. If you are trying to get PHP to connect to a PostreSQL DB on a linux box for the first time and you are sure your pg_hba.conf on the target box is setup correctly then try this:

    setsebool -P httpd_can_network_connect 1
    

    This should configure SELinux to allow Apache/PHP to connect to other hosts.

  • National Broadband Map Review

    National Broadband Map Review

    The National Telecommunications and Information Administration (NTIA) in collaboration with the FCC has published a series of broadband maps on a new site called National Broadband Map (NBM). These maps show what broadband services are available throughout the United States as well as other interesting broadband data.

    Hit this link and click the “Explorer the Map” option on their main page to see a map of the US with shaded areas where selected broadband services are available. You can click different selections above the map to toggle the various broadband technologies. To see other maps such as advertised versus actual broadband speeds click on the “Show Gallery” option in the lower right hand corner.

    Rochester, NY does pretty well on advertised versus actual although there a few slower than advertised points here and there. Upload performance data is also available. Usually the cable and DSL providers don’t brag much about upload performance likely because in most cases it is lousy compared to download performance. I think upload performance will become more important to the typical internet user than it as in the past now that people are sharing their pictures and video online.

    The NBM site use a variety of open source technologies including:

    • JQuery – My favorite JavaScript library.
    • Modernizr – A JavaScript library to detect browser capabilities.
    • OpenLayers – Provides a JavaScript API to display WFS and WMS GIS layers.
    • GeoServer – A Java based server software that provides WFS and WMS services.

    What is particularly interesting about the site is the developer resources. They provide a series of API’s you can call from your own web applications to use their data. Output formats include XML, JSON, and JSONP implementations. If you want to use the data locally without the APIs you can download it.

    I do have a couple criticisms regarding the maps and ironically, they are bandwidth related. The first is that there are too many tiles returned when viewing the default map of the US. I noticed the map was a little slow to fill in. When I enabled Firebug and clicked on the “Explore the Map” option off the main page, over 500 tiles were pulled down. In fact, Firefox/Firebug became unresponsive. I would expect less than 30 256×256 tiles need to be pulled down for a reasonably sized browser window. I wager there is something goofy going on like a bounding box not set for the area displayed.

    My second criticism is that the site is not using gzip to compress JavaScript files. Modern web applications tend to lay on the JavaScript pretty heavy and this one is no exception. OpenLayers.js is nearly 1MB all by itself. By enabling gzip on sites with large JavaScript files you can significantly improve site performance. This is a good topic for a future post.

    Overall I think the National Broadband Map Site is an excellent resource. It provides very useful data on broadband technologies/speeds, makes this data available via APIs or download, and also demonstrates a variety of open source web application technologies.

    Is it worth the $20 million that contractors were paid to build the map? I would say certainly not at first glance but I would want to hear the whole story before I jump to conclusions. I.e. how much of that $20 million was spent on actual development? I am much more skeptical of the alleged $293 million required to collect the data.

  • MsMpEng.exe – Microsoft Security Essentials high CPU Utilization

    MsMpEng.exe – Microsoft Security Essentials high CPU Utilization

    If you are running Microsoft Security Essentials with real-time protection enabled on a machine running ThinkVantage Access Connections you might notice the MsMpEng.exe service consuming most of your CPU time. This will cause your Lenevo laptop to run obnoxiously slow. Allegedly this issue was fixed with a new version of Access Connections but on a laptop I was working on the problem persisted even after I updated Access Connections.

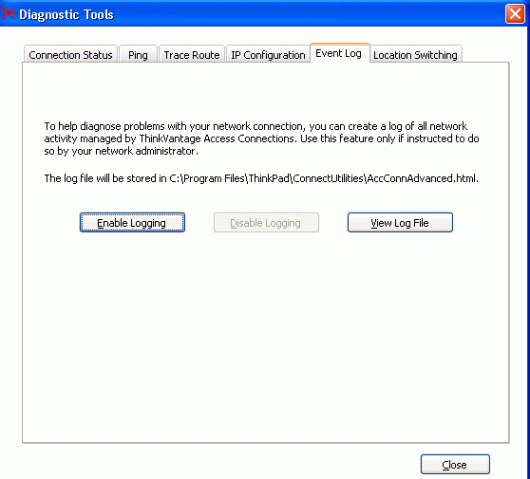
    If logging is enabled in Access Connections the “AccConnAdvanced.html” file will continuously be updated. Microsoft Security Essentials appears to then scan this file over and over again after each change. This is probably causing the processor to burn your precious battery life away. This way Lenovo can sell more battery pack upgrades. 😉

    There are two ways to fix this: Add an exception to Microsoft Security Essentials or disable logging in Access Connections.

    If you want to continue logging Access Connection activity you can add an exclusion in Microsoft Security Essentials:

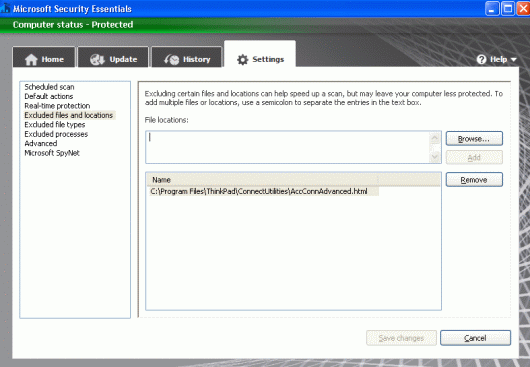
    1. Open up Microsoft Security Essentials and click on the “Settings” tab.
    2. Select “Excluded files and locations”.
    3. Click the “Browse…” button and select the “AccConnAdvanced.html” which, should be under “C:\Program Files\ThinkPad\ConnectUtilities\” by default. Click “OK”.
    4. Click “Add” and then “Save changes”. MsMpEng.exe CPU utilization should then drop to around 0%.
    add microsoft security essentials exclusion

    Here is how you can disable logging in Access Connections (at least on Windows XP).

    1. Launch Access Connections: “Start”->”Programs”->”ThinkVantage”->”Access Connections”.
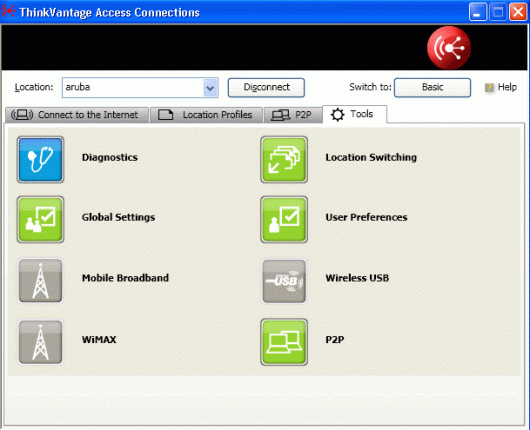
    2. Once Access Connections is up switch the view to “Advanced” by clicking the “Advanced” button in the upper right hand corner.
    3. Click the “Tools” tab and then “Diagnostics” and then the “Event Log” tab on the Diagnostics Tools screen.
    4. Click “Disable Logging” and then click “Close”. The AccConnAdvanced.html file should no longer grow and MsMpEng.exe CPU utilization should drop to nearly 0%.
    access connections tools
  • How to add a custom context menu to a Spark TextArea in Flex 4

    How to add a custom context menu to a Spark TextArea in Flex 4

    There is a current known issue with adding custom context menus on a RichEditableText Spark component:
    http://bugs.adobe.com/jira/browse/SDK-23926

    This includes the TextArea component. Essentially, any custom context menus will not show up. There is a work around mentioned in the comments for the bug on Adobe’s website but I thought I would re-hash and show an example since this had me a bit stumped.

    The work around is to attach the context menu to the TextArea’s TextDisplay object via the “textDisplay()” accessor method. I have created a simple example with source.


  • SWFObject flashvars, params, and attributes

    I have been working with SWFObject a bit lately and was a little confused by how the flashvars, params, and attributes arguments for the embedSWF() function differ from each other and what exactly SWFObject did with them. Based on the documentation, I did a little experiment where I used each and then viewed the generated source using the Web Developer Toolbar for Firefox.

    Here is my HTML and SWFObject JavaScript which uses the dynamic publishing method as described in the SWFObject Documentation:


    Embed Fail

    Here is what the generated source looks like after I load the page in Firefox and SWFObject has done its thing:


    As you can see the attributes are just attributes to the object tag. The parameters show up inside of param tags with one param tag for each param following the object tag. I would be curious to hear if anyone has used the “attributes” and “parameters” arguments when embedding Flash with SWFObject and for what.

    The flashvars argument is the most useful in my case because that is how you can get external data passed into the SWF. I think a lot of folks load in their data into a Flash movie using a separate call to load an XML document. That is the way to go if you are pulling a large amount of data dynamically based on some type of user input.

    If you only have a few name value pairs that are not going to change, passing these in during the embed using flashvars is probably the better option. Assigning these values during the embed will save a second round trip you would normally make to get an XML document.

    So let’s say you decide you want to pass in a couple key-value pairs to a Flash movie using SWFObject. In the code example above there are two key-value pairs we assign to flashvars: “my_flashvar1” and “my_flashvar1”. Now you will want access these two inside your ActionScript code.

    For ActionScript 2 it would look something like this:

    trace(_level0.my_flashvar1);
    trace(_level0.my_flashvar2);
    

    ActionScript 3 requires another line of code to get to the same place:

    var paramList:Object = this.root.loaderInfo.parameters;
    trace(paramList["my_flashvar1"]);
    trace(paramList["my_flashvar2"]);
    

    A word of caution: When you use SWFObject’s embedSWF() function there are quite a few optional parameters. Be sure that you put a “false” in for optional parameters you don’t intend to use before any parameters you ARE going to use. In the embed example below I want to use the flashvars option but I don’t want to use the option to specify an express install file so I put in a false in that spot. Also, just be careful in general because there are a total of 10 different arguments for the embedSWF() function (including all the optional ones) so it is easy to get them in the wrong order and such.

    swfobject.embedSWF("Test.swf", "embedhere", "300", "250", "9.0.0", false, flashvars);
    

    Take a look at the SWFObject documentation for a description of each parameter.

    That’s it!

  • 25 ways to insecurity

    The 2009 CWE/SANS Top 25 Most Dangerous Programming Errors was recently released by CWE/SANS.

    Most of the items are old news but I think it is a good checklist that should be on the boiler plate for web application design documents. By putting security requirements in the software specification and design documents, the project manager can then allocate time and resources to security aspects of development. In addition, it reminds developers to ask themselves if the software is meeting those requirements throughout the development process. This is opposed to thinking about security after the entire application has been written and discovering a fundamental design flaw that will require re-writing a good portion of the application.

    I particularly appreciate that each item on the CWE/SANS list is weighted including weakness prevalence, remediation cost, attack frequency, attacker awareness, etc. No project has an unlimited budget but you can prioritize on where to focus your resources to achieve the most secure solution. Generally it is a good idea to ensure that the cost of defeating an application’s security far outweighs any benefits to be gained from doing so. The cost of defeating an application might include labor time, computing resources, fines, and threat of jail time with a cell mate named Bubba, etc.

    It is quite a challenge to develop secure web applications because generally by their nature they need to accept user input. I believe that it is typically much more difficult develop a secure system than it is to break in to the system given the same number of hours so there is often more burden on the developer. It might take only two or three days to develop a working database driven web application but many additional weeks to harden it against attacks and make it reliable, scalable, and highly available. Including security requirements in the software specification and design is essential to planning and allocating resources.

    Ideally automated tests should be included to continuously test vulnerabilities throughout the life of an application. This way security vulnerabilities introduced by code changes will be detected early in the development process instead of later in production. Automated tests could attempt buffer overflows, sql injections, etc. and could be executed prior to a developer’s check-in or on a nightly cron job that automatically checks out the code and runs the tests against it. Although costly to implement initially, automated security testing will likely pay for itself many times over the course of an application’s life. I plan to talk more about automated testing in future posts.

  • My Geek Christmas

    I think we are done with our various Christmas celebrations and my friends and family over-did for me this year (as usual):

    I also received some gift cards:

    I bought a little something for myself. My soldering irons are getting a bit old and I wanted a nice solder station to build my Mousebot with:

  • Another geek blog…

    I intend to post my web development notes here for my own reference and in hopes that others might find some useful bits.